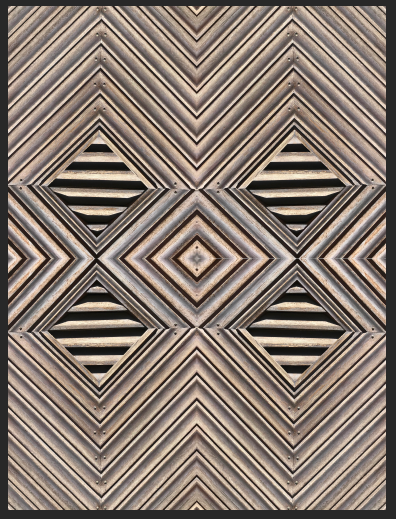
Balance, a principle of Design, refers to how the elements of art (line, shape, color, value, space, form, texture) relate to each other within the composition in terms of their visual weight to create visual equilibrium. That is, one side does not seem heavier than another. Symmetry or symmetrical images have equal visual weight and generally have pattern repeated. It can be radial. Asymmetrical is not equal on both sides but keeps the viewers attention.
Your project will replicate a kaleidoscope.
For this project you need to take NEW images that can be copied and transformed to create a symmetrical image. You can not use images from other projects that have been posted to your online portfolio. These images need to be PLANNED, NEW and EDITED. You can choose a theme. Think about the edges of the image or the frame. You will need a total of 10 images. You do not need to show the original image like the examples below but you can. Titles are needed for all images.
For Credit you will need to:
Take 10 unique images to make Symmetrical
Edit and compress images
Follow the Demo directions below to make 10 Symmetrical images
Take screenshots of images (to large to save and post to Weebly)
Post 10 unique Symmetrical images and 10 titles to a new Weebly page titled Symmetry
Below are examples. There is a Step-By-Step and Video Demos below. It is a quick exercise but the images should be EPIC! If your images are not working than you might need to reshoot.


Step by Step Instructions
1. Open your selected image in Photoshop. Compress all adjustment layers after editing (command to select and command e to compress).


3. You need to transform your image. Click command t and a box around your image will appear.

4. While it is active go to Edit- Transform and select Scale.

5. Scale your image in the highlighted blue box above your image.

6. Enter 50.00 and hit enter.

7. Move your image to a corner of your canvas.

8. Copy this layer. Command j.

9. On the copy layer you want to transform the image. Command t.


10. Go to Edit- Transform and select Flip Vertical.

11. Move the image and hit enter or return.

12. Select both Layers. Commend and select.

13. Compress the selected Layers. Command e.

14. Copy the new compressed layer. Command j

15. Transform this layer. Command t.
16. While copy is in Transform Mode go to Edit- Transform- Flip Horizontal.

17. Move new copy to make the image Symmetrical.

18. Take a screen shot to post to Weebly.

Directions for Photopea.com
1. Open your image in Photopea.com and go to Image- Image size. Make sure to convert to inches and either make it 8 x 10.67 (portrait) or 10 x 7 (landscape) inches. It does not have to be exact but you will have a problem if you try to post to weebly if you do not resize.


3. Copy this layer- command + j.

4. Click on the image on the copy layer. Grab the left middle bracket and drag to the opposite side.


5. Compress these 2 layer- command + click and command + e.


6. Click on the copy layer. Grab the middle top bracket and drag down.

Notes to have handy for the video on how to do the Symmetry Project
Unlock- click on lock icon to the right of the image
Transform- command t
Scale- edit- transform- scale- 50%
Copy Layer- command j
Flip Vertical or Horizontal while image is in
Transform Mode (command t)
Edit- Transform- Vertical
Compress Layers-
command and select layers (highlighted)
command e
Move an image- move tool or arrow buttons
Digital Photography Project Rubric by mlgiltner on Scribd
Barcelona KALEIDOLAPSE from myLapse on Vimeo.