
‘A LANDSCAPE IMAGE CUTS ACROSS ALL POLITICAL AND NATIONAL BOUNDARIES, IT TRANSCENDS THE CONSTRAINTS OF LANGUAGE AND CULTURE.’ -CHARLIE WAITE

This project will allow you to take a landscape photo of nature. Please no buildings you can take those type of photos for the Architecture Project. You will need to find areas of interest like a corn, flower, or wheat field. You can take pictures of forest and take details of mushroom. To achieve this you will need to be aware of such things as lighting and viewpoint. Time of day is also a major factor. You may choose to shoot at dawn, noon, in the evening, dusk or after dark. The light you choose can really add drama, emphasis and mood to your photos. Make sure to crop the image within your viewfinder. Plan your composition. Take pictures from different angles and perspectives.. Choose more than one location. The more variety the better your later projects will be.

For this lesson you will be taking photos of landscape and nature in a location where there are 5 unique views. You may not take photos of landscape around your house. Landscape gives you the opportunity to apply your understanding of foreground, middle ground and background through your images. All three parts of a landscape are equally important.

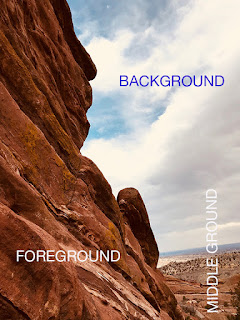

But you may focus on just one part of nature like a flower but again the picture will be divided like above as in you will still have the 3 parts to the image: foreground, middle ground and background.

Through these examples you should be able to see that each part makes the whole. Nothing in manmade and in a way we are looking at each part instinctively and judging each part separately.

Michigan offers such great opportunities to get out and take pictures of nature and the natural landscape. Skyline offers it own natural landscape.
To help inspire your creativity please look at the following artists: Colby Brown, Karl Blossfeldt, Bret Edge, Ansel Adams, Berenice Abbott, Lars Van De Goor, Philip Hyde, Joseph Holmes, Eliot Porter, Charlie Waite, Marc Wilson, Niel Weaver, Steven Huyser-Honig and Galen Rowell.
To help inspire your creativity please look at the following artists: Colby Brown, Karl Blossfeldt, Bret Edge, Ansel Adams, Berenice Abbott, Lars Van De Goor, Philip Hyde, Joseph Holmes, Eliot Porter, Charlie Waite, Marc Wilson, Niel Weaver, Steven Huyser-Honig and Galen Rowell.
Great inspiration on various Landscape Photographers and their work are on this site http://www.lightinframeblog.com/100-landscape-photographers-worth-knowing/#sthash.XS0Q5334.dpbs
Try this site as well https://hyperallergic.com/371899/karl-blossfeldt-masterworks-photography/
And if that does not help look at the right side bar of this link http://newlandscapephotography.com/ for Landscape Photographers.

You
must turn in a minimum of 25 of your best photos to your folder. I suggest 5
different places in which you photograph 5 different angles, time of day or be
creative. Please do not include people or animals in your photos.
Save all photos taken in a folder named Landscape.
You will need to edit 10 (2 of each
location).
Post on you weebly after approval. Remember to include
your artist statements as well and Self Evaluation.
Artist
Statements. Titles for ALL images.
You are to write a
one-paragraph (5 sentences minimum), narrative to accompany EACH of the
locations. Your statement should discuss what & where you chose to take
your photos, why you choose the composition and what feeling are you trying to
convey. Please include any trial, errors and triumphs you had with the photos. *Your
Artist Statement should be posted to weebly.


In this Photoshop effects tutorial, we'll learn how to easily make a photo look more like a watercolor painting. This photo effect works best on images where maintaining rich colors and strong contrast is more important than keeping any fine details, since you'll be losing a lot of detail with this effect.
Creating the effect is as simple as duplicating some layers, applying a few filters, and using a few different layer blend modes, and the whole thing takes only a couple of minutes from start to finish. Please note that this tutorial was written for Photoshop CS5 and earlier. Photoshop CC and CS6 users will want to follow along with my updated version which also includes a video of the steps.
Here's the image I'll be using for this tutorial:
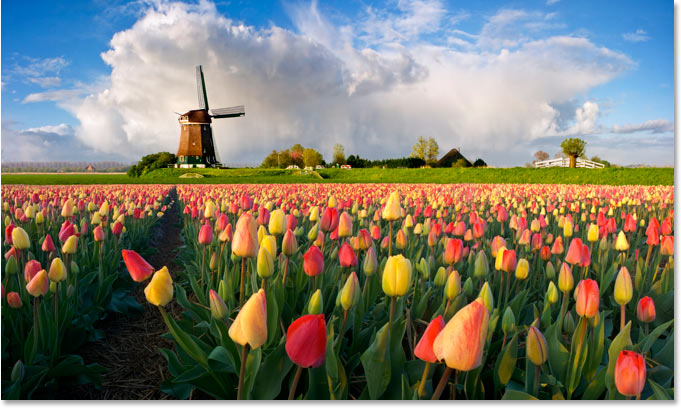
The original photo.
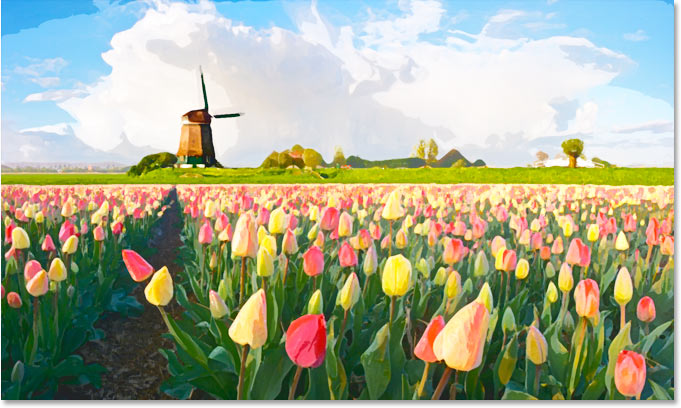
And here's how it will look after applying our watercolor painting effect:
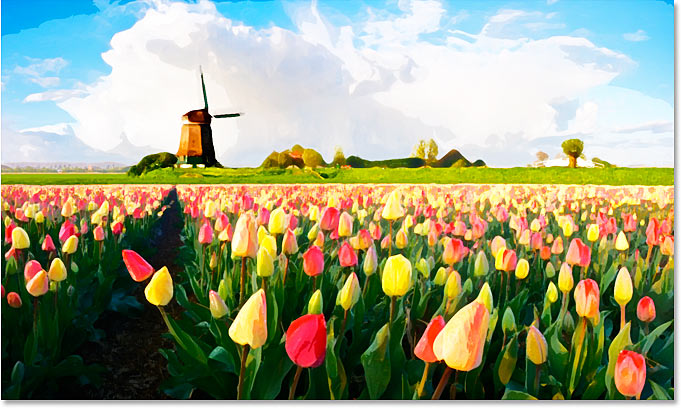
The final watercolor painting effect.
For a video of this tutorial, check out our Photoshop Watercolor Painting Effect on YouTube. Let's get started!
With the image newly opened in Photoshop, if we look in our Layers palette, we can see that we currently have one layer, the Background layer, which contains our image:
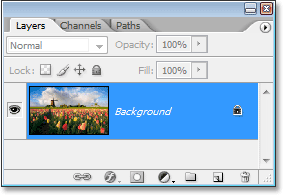
The Layers palette in Photoshop showing the image on the Background layer.
We need to create three copies of the Background layer, so use the keyboard shortcut Ctrl+J (Win) / Command+J (Mac) three times to duplicate the Background layer three times. If we look again in our Layers palette, we can see that we now have four layers, with the original Background layer on the bottom and three copies above it:
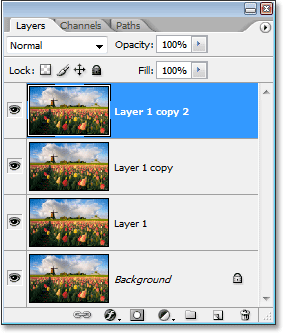
Press "Ctrl+J" (Win) / "Command+J" (Mac) three times to duplicate the Background layer three times.
Step 2: Turn Off The Top Two Layers
On the far left of each layer in the Layers palette, you'll see a small eyeball icon. This is the Layer Visibility icon, and it determines whether or not the layer is currently visible in the Photoshop document. When the eyeball icon is visible, it means the layer itself is visible. Click on the icon for the top two layers in the Layers palette to temporarily hide them from view inside the document. When you click on the icon, it disappears, letting you know that the layer is no longer visible:
Hide the top two layers in the document by clicking on their Layer Visibility (eyeball) icons. The icons disappear when clicked on.
Step 3: Select "Layer 1"
With the top two layers temporarily hidden from view, click on "Layer 1" in the Layers palette to select it. You'll know which layer is selected because the currently selected layer is highlighted in blue:
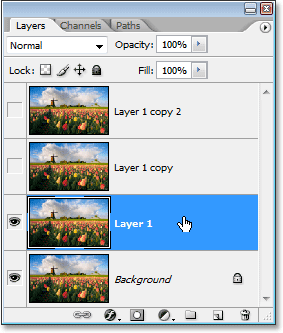
Click on "Layer 1" in the Layers palette to select it.
Step 4: Apply The "Cutout" Filter
The first thing we're going to do is simplify our image, and we can do that using Photoshop's "Cutout" filter. With "Layer 1" selected, go up to the Filter menu at the top of the screen, choose Artistic, and then choose Cutout.
When the Cutout filter's dialog box appears, set the Number of Levels to 4, Edge Simplicity to 4, and Edge Fidelity to 2:
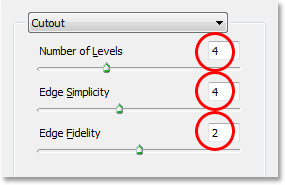
Go to Filter > Artistic > Cut Out and change the options circled in red above.
Click OK when you're done to apply the settings and exit out of the dialog box.
Step 5: Change The Blend Mode Of "Layer 1" to "Luminosity"
With "Layer 1" still selected, go up to the Blend Mode options in the top left of the Layers palette. By default, layers are set to the "Normal" blend mode. Click on the down-pointing arrow to the right of the word "Normal" and select the Luminosity blend mode from the bottom of the list:
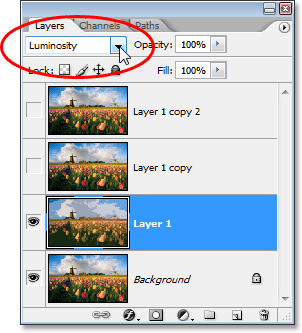
Change the blend mode of "Layer 1" from "Normal" to "Luminosity".
Your image should now look something like this:
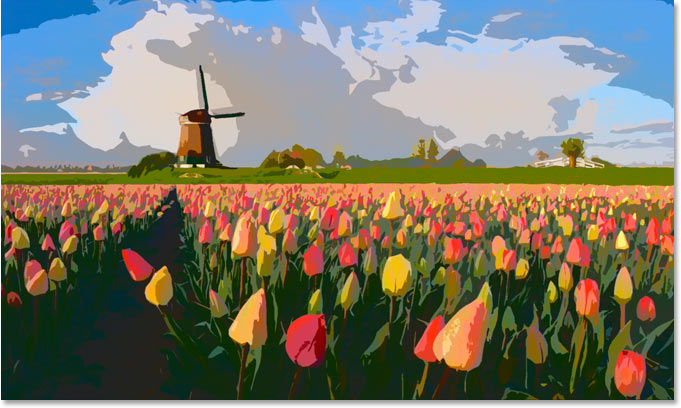
The image after changing the blend mode of "Layer 1" to "Luminosity".
Step 6: Turn On The Layer Above "Layer 1" And Select The Layer
Still in the Layers palette, click inside the empty square where the eyeball icon used to be on the layer directly above "Layer 1" ("Layer 1 copy") to turn that layer back on, so it's visible again inside the document. Turning a layer back on doesn't actually select the layer though, and we need to have it selected as well, so once you've turned the layer back on, click anywhere else on "Layer 1 copy" to select it so it's highlighted in blue:
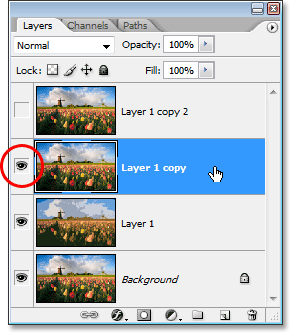
Click on the visibility icon (the empty square) for "Layer 1 copy" to turn it back on, then click anywhere else on the layer to select it.
Step 7: Apply The "Dry Brush" Filter
We're going to add some texture to our image at this point. With "Layer 1 copy" selected and visible once again inside the document, go back up to the Filter menu at the top of the screen, choose Artistic once again, and this time, choose Dry Brush. When the Dry Brush filter's dialog box appears, set the Brush Size to 10, the Brush Detail to 10, and the Textureoption to 3:
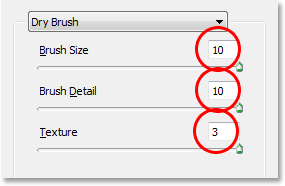
Go to Filter > Artistic > Dry Brush and change the options circled in red above.
Click OK when you're done to apply the filter and exit out of the dialog box.
Step 8: Change The Layer Blend Mode To "Screen"
With "Layer 1 copy" still selected, go up to the Blend Mode options once again in the top left of the Layers palette, click on the down-pointing arrow to the right of the word "Normal", and change the blend mode for the layer to Screen:
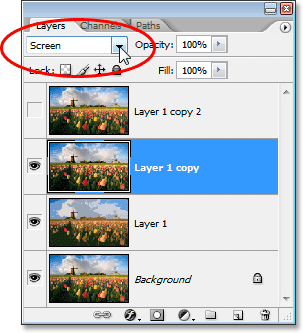
Change the blend mode of "Layer 1 copy" to "Screen".
Your image should now look something like this:
The image appears brighter after changing the blend mode of "Layer 1 copy" to "Screen".
Step 9: Turn On The Top Layer And Select It
Just as we did with "Layer 1 copy" a moment ago, click inside the empty square where the eyeball icon used to be on the top layer in the Layers palette ("Layer 1 copy 2") to turn the layer back on and make it visible once again inside the document. Then click anywhere else on the layer to select it so it's highlighted in blue:
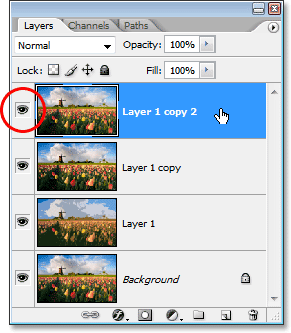
Turn the top layer back on by clicking on its Layer Visibility icon in the Layers palette, then click anywhere else to select the layer.
Step 10: Apply The "Median" Filter
With the top layer selected and visible again inside the document, go back up to the Filter menu at the top of the screen, this time choose Noise, and then choose Median. The Median filter will remove even more detail from the image, and the nice thing about it is that it does so without blurring the image so edges remain well defined. When the Median Filter's dialog box appears, set the Radius value at the bottom to 12 pixels:
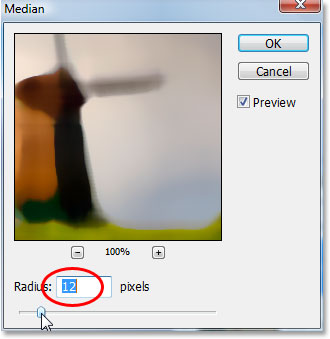
Go to Filter > Noise > Median and set the "Radius" value to "12 pixels".
Click OK when you're done to apply the filter and exit out of the dialog box.
Step 11: Change The Blend Mode Of The Top Layer To "Soft Light"
To complete the effect, with the top layer still selected, go up to the Blend Mode options in the top left of the Layers palette, click again on the down-pointing arrow to the right of the word "Normal", and change the layer's blend mode to Soft Light:
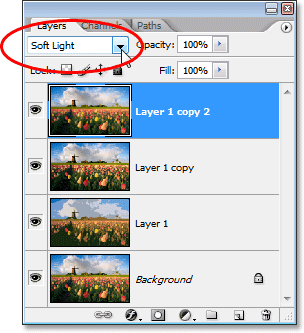
Change the blend mode of the top layer to "Soft Light" to complete the effect.
Once you've changed the blend mode to "Soft Light", you're done!
Here's my original image once again for comparison:
The original image once again.
And here, after applying the Median filter to the top layer and changing its blend mode to "Soft Light", is my final
"watercolor painting" effect:
"watercolor painting" effect:
The final watercolor painting result.